Introduction
Time-aligning the speakers in your car (if your car audio system
provides this feature either via your head-unit or external processor) can
make a significant difference to imaging
(which tends to be pulled towards the nearest speaker to the driver) and
tonality (which can suffer because of phasing issues at the listening
position as it is usually not centered between the speakers). The following
outlines an illustrates a simple means of using the freeware tool HolmImpulse to time-align
the speakers in your car audio system. The whole process can be done in 1/2
hour or less, depending on how familiar you are with HolmImpulse and what
equipment you have on hand.Step #1: - Get your
tools together
The first step is of course to get your hands on the correct equipment,
which should consist of a laptop or netbook PC to run HolmImpulse (Windows
XP or Windows 7), a microphone (which does not have to be too accurate, as
you are not doing frequency response measurements with it), a means of connecting
the PC's audio output to your car audio system and of course a copy of
HolmImpulse itself, which is available from this site: -
http://www.holmacoustics.com/holmimpulse.php
For the best results, do not have any other programs open
at the same time as HolmImpulse.
The image below shows the equipment that I currently use
for my measurements: -
- A HP netbook PC with HolmImpulse installed
- A Behringer ECM8000 mike connected to a mike/ USB
interface, which is in turn USB port #1 on the PC
- A SoundBlaster USB audio interface connected to USB
port #3 on the PC

Step #2: - Connect everything up
This step is pretty straightforward - connect the PC's audio output to
your head unit (most have sort of "aux in" interface that can be used for
this moment). Also, place the microphone as close as you can get to your
usual listening position. Make sure that it is properly secured as
your measurements will be off if the microphone moves. Finally, set the head
unit volume low enough so the output from the microphone isn't clipped (you can
check this using the "Monitor" feature of HolmImpulse and checking the
recording level during the initial measurement).
Step #3: - Configure HolmImpulse for measurement
Open HolmImpulse and, under the "Device and Signal" tab, select the
"Square Noise (Improved MLS)" option. Also, select the "Keep in/out
stream active" option and click the "Start" button to start the stream. Once
configured correctly, the information under that tab should look similar to
the image below:

Now, on the "Data Analysis" tab, select the "Detect Time
Zero" option The information under this tab should now look similar to the
image below:

Step #4: Set your initial time-alignment settings
For the best results, you should adjust the time alignment settings on
your head-unit to closely mirror the physical distances of each speaker from
the measuring point. This can be done very quickly with a tape measure and
significantly reduces the time spent fiddling with HolmImpulse to get it
right. On my current head-unit, a Premier 980BT, the time-alignment
adjustment screen looks like the following image:

Step #5: - Perform initial measurement
Now, perform your first measurement. For this measurement, I suggest
selecting the speaker that is furthest from microphone and using your head
unit's Balance and Fader settings (and, if necessary, the subwoofer output
level) to ensure that sound is coming only from that speaker. On my system's
current head-unit, that adjustment looks like the following image (the
listening position is the right front seat):

Make the first measurement by selecting the "Measurements"
tab and clicking on one of the three "Measure" options. You should hear
noise through the selected speaker for a few seconds, and then shortly after
that the frequency and impulse response of the speaker will be displayed,
similar to the image below:

Step #6: - Set time zero lock
At this point, select the "Data Analysis" tab again, and
then the select the "Time zero locked (time alignment)" option, then click
on the "Use" button. This basically sets the measurement you just
performed as the reference measurement. If you switch back to the
"Measurements" tab now, you'll notice that the impulse response is now
starting at or very close to the zero point on the scale. Note that you can
zoom in on the impulse response by selecting the section you want to zoom
(with the mouse or touchpad). I suggest zooming in until the scale is
plus/minus 20 cm or so. The impulse response graph should look
something like what it does in the image below:

Step #7: Measurement and adjustment
Now, it's time to do some time-aligning! Adjust your head-unit's
Balance and Fader controls to make all of the sound come out of the first
speaker that you want to align, then perform another measurement as outlined
above. This time however choose one of the other "Measure" options on the
"Measurements" tab. You should end up with something like looks like the
image below:
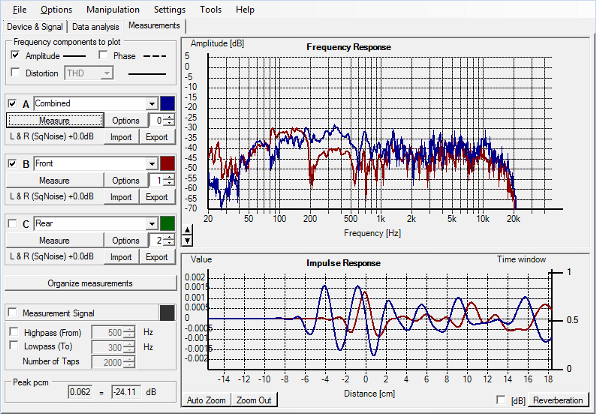
The example impulse response graph above shows that the
just-measured speaker (in blue) is about 4cm forward of the reference
speaker. To time-align the speaker in this example, the time alignment
options offered by the head-unit or external processor will need to be
adjusted to subtract 4cm from the speakers' position relative to the
microphone, the intent here being to ensure that the rise for both of the
initial positive peaks intersects (or is as close to intersecting as
possible.). Once the adjustment is made, repeat the measurement to
confirm that change was successful.
For the example above, a correct adjustment would look
like the image below:

And that's basically it! Simply repeat step #7 for
the other speakers in your car for which your head-unit or external
processor offers time alignment options.
Brian Steele
27 January 2019 |