A fiberglass spare tire well car subwoofer
27 January 2019
The 1200GTi is one of JBL's better 12" car subs, though there are some caveats. For one, the T/S parameters provided wth my 1200GTi subs were not entirely accurate. JBL quoted the Qts figure as 0.47, and it actually seems to be around 0.42. This has a significant effect on enclosure calculations, and serves as a good example of why it's so important to have the T/S parameters measured for a particular sub before you commit to a particular design. The 1200GTi has an Xmax of 0.31" and an RMS power rating of 600W(!).
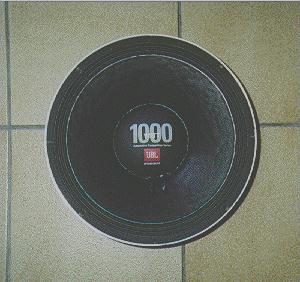
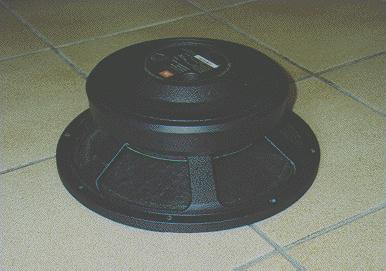
These are views of the JBL 1200GTi from the front and the rear. You'd notice that there's a very close similarity between the 1200GTi and JBL's professional audio subs.
| JBL 1200GTi - front view | JBL 1200GTi - rear view |
 |
 |
The MEASURED T/S parameters for my two 1200GTi subs averaged as follows:
| Vas | = | 2.4 cu.ft. |
| Fs | = | 30 Hz |
| Qms | = | 5.77 |
| Qes | = | 0.45 |
| Qts | = | 0.42 |
Out with the spare tire!
One of the problems that I've had with my car subs in the past is that they're
always in the way when it's time to change a tire. Two 2 cu.ft. enclosures holding JBL
1200GTi subs are pretty heavy, and I continually had visions of getting a flat-tire late
at night somewhere obscure and having to shuffle the boxes to and from the trunk in order
to get access to the spare tire.
Then the brainwave hit - why not use the spare tire well as the enclosure and
have the spare tire placed on top, or to the side of the speakers? This will allow me to
keep my subs, and still have easy access to my spare tire in case of an emergency. The
idea seemed reasonable enough - and has been done before.
Fiberglass?
In order to maximize the use of the volume of the well, I opted to use a fiberglass
enclosure instead of building a box that fit within the well. A wooden enclosure that
snugly fit in the well would be a bit difficult to build because of all the curves, and
precious volume would be lost in the process.
Problem was, I didn't have any experience with fiberglass...
So, I searched around the 'net to see if anyone else had tried this and published their techniques. I came across two pages where the author mentioned the use of tinfoil to isolate the resin and fiberglass from the well while creating the enclosure, so I tried that. Chaps, this is NOT such a good idea, as the resulting structure is certainly not very pretty - the creases in the tinfoil transferred themselves to the resin, and some sections of tinfoil got permanently embedded, resulting in a very ugly-looking enclosure.
I posed a question concerning the use of fiberglass to the DIY Loudspeakers and Related Topics List (something I should have done PRIOR to building the enclosure!), and the chaps on the list came back with the following alternatives to tinfoil:
Mold release agents
(Dry lubricant release agent #ms-122/22)
(Frekote 1711 mold release)
PVA (PolyVinyl Acetate) release agent
Carnuaba Wax + PVA release agent
WD-40!
Mylar (oiled with WD-40, or PAM)
Saran Wrap (oiled with WD-40, or PAM)
If I was doing this again, I'd go with the PVA release agent - it comes in spray form, and would be much easier to apply than tinfoil, Saran Wrap or other films, and would probably give better results. As the fit would be close, protrusions in the well should be smoothed out first with modelling clay before the PVA and resin are applied, otherwise you might not be able to remove the enclosure when it's finished!
I used fiberglass mat instead of the weave stuff - because it came in larger sizes! 24 sq. ft. was about enough (I haven't reinforced the enclosure yet). Turns out that the mat was a good choice - the woven stuff is less malleable and doesn't build up a good thickness as quickly as the fiberglass mat.
Normally, you'd apply the fiberglass layers one after another in one sitting. However, I chose instead to let the first layer dry, then I removed the enclosure from the trunk to my work room (a.k.a. my porch) for further work, as doing this kind of work in the trunk of a small car was not easy on my back or knees! I built up one more layer of fiberglass within the enclosure, but stopped there, as I was running out of fiberglass mat! The resulting enclosure seems sturdy enough, and the steel walls of the well should add extra reinforcement.
Sanding the enclosure is a bit of a nightmare - finishing sanders don't work
properly on the concave enclosure, and hand-sanding is too slow. A rotary sander worked in
some places, but in many others it came down to a couple of sheets of waterproof
sandpapaer and good old elbow grease.
Caveats
Fiberglass and resin are pretty easy to work with, but you've got to
take some precautions.
- Work in a well-ventilated area, unless you're one of those glue-sniffing types. The solvent used in the resin is pretty powerful stuff.
- Wear gloves - resin gets everywhere, no matter how you try to avoid this. I used two layers of disposable plastic gloves for each application of resin.
- Wet down any areas that you're going to sand, to prevent dust from going all over the place.
- Don't do this in your living room - fibers from the fiberglass mat get everywhere, and are VERY uncomfortable.
**** UPDATES ****
UPDATE: 13th May 1996
Well, the enclosure's finished... mostly. The performance is um,
average, and not as good as I think it can be. The drawbacks to getting great response
from the enclosure seem to be:
-
Enclosure Vibration
The fiberglass portion of the enclosure is light and pretty thin (compared to 3/4 ply). It is therefore subject to a LOT of vibration, if not adequately braced. And brace it I did, using fiberglass "vanes" at various places within the enclosure. Unfortunately it STILL vibrates, so more bracing is called for.The plywood baffle is also subject to vibration, even though it is braced with a small 4" plywood "shelf" attached perpendicularly inside. I will have to do some more work on this as well.
Car Panel Vibration
This seems to be the greater of the two problems. The fiberglass enclosure is in very close proximity to the bottom of the vehicle, and the result seems to be even more rattles and bangs than usual when I turn the bass up! Dynamat may help here, but it's a but late to apply it now. I'm going to try a later of carpeting (the stuff you use to cover speaker boxes) to see if that helps. I'm also going to see if there's a way to stop the side panels from vibrating as well, because it's VERY annoying!
UPDATE: 11th August 1996
Most of the problems described above have been dealt with. The enclosure
vibration was reduced when I applied more bracing to the inside of the enclosure. The
decrease in internal volume doesn't seem to have adversely affected its response - in fact
it sounds MUCH better, probably due to the better bracing. The car panel vibration was
reduced by using packing foam (the soft type used to ship electronic components) between
the enclosure and the panels, and also inside other panels within the trunk. I still get
some rattles and bangs when I turn up, but considerably less than before!
UPDATE: 7th December 1996
I've finally cured the vibration problem! The solution was actually
quite simple - three wooden braces between the wooden baffle and the fiberglass mould.
I used 1" square wood scraps that I had lying around, and whoa, what a
difference! Almost all of the vibration is gone now - the baffle simply does not vibrate
any more. Neat thing is - the enclosure (without the speakers) is still nice and light, so
it's easy to take out of the car, if I REALLY need a little extra trunk space.
I'd suggest that, if you're planning to do your own fiberglass enclosure, also plan to use
braces running from the front to the rear of the enclosure. It really makes a difference!
UPDATE: 5th January 1998
Well, I've finally got some pictures for you! The pictures were taken just
before Christmas 1997, so there's a bit of "wear and tear"visible in the
pictures. Dec is rainy season in Grenada, hence the dirty vehicle (doesn't make any sense
washing it, when it rains at least once a day...:-)). Note: click on the pictures to see
the full size version.
 |
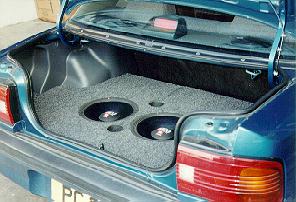
The completed enclosure. The drivers are protected by metal grilles that are covered with matching carpet. I think that there was a slight change in the bass output (Qts should decrease), but I haven't confirmed it by measurement yet. The grilles are held in place by removeable clamps. |
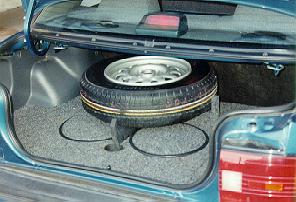 |
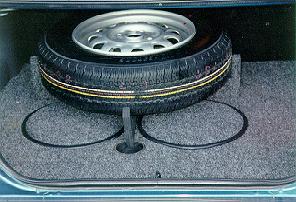
This is a diagonal view of the trunk, showing the present placement of the spare tire, which is held in place by a wooden bracket that fits partly into the ports (movement is therefore restricted). The bracket is unfinished, and I may replace it with a better-designed version. |
 |
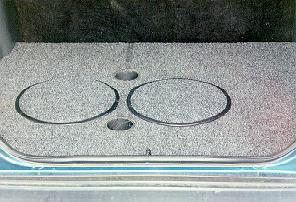
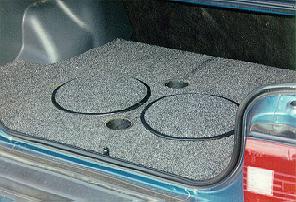
Another diagonal view of the trunk, with the spare tire and speaker grilles removed. The drivers are flush-mounted, and a carpet can be thrown over them for that "stealth" look. |
 |
Front view, with grilles and spare tire in place. I'm thinking of making a shroud for the tire... |
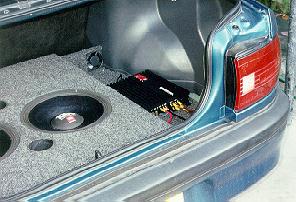 |
Diagonal view of trunk, with right side panel removed, showing the amplifier (MTX 4160 bridged into two channels) and the cooling fan (salvaged from an old computer power supply). |
 |
Front view, with tire and grilles removed. |
 |
Diagonal view, with spare tire removed. |